How to change a visor on a Motorcycle Helmet is a simple task.
In this short article and video clip we show you how to quickly change the visor or shield on a genuine Harley-Davidson motorcycle helmet. This is handy if you wish to switch from a your clear visor to the tinted option. The basic principle of how to change a visor on a motorcycle helmet is the same for most helmet brands. And always refer to the manufacturers handbook for the correct procedure. Each visor clips to the helmet with a release button or tab near the ear area of the helmet. Once you have found this tab it will make changing your visor a simple operation. However, sometimes the release mechanism is concealed, so refer to the owner’s manual of your helmet for specific instructions on locating it.
Step by Step
1. Rest your helmet on a soft surface to prevent it getting scratched or damaged.
2. Open the visor as far as it will go, sliding it up on to the top of the helmet.
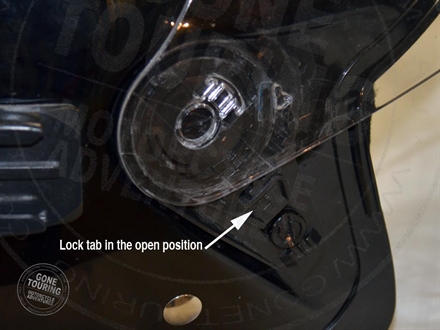
3. Locate the release mechanism. This appears like a thumb tab or button.
4. Press the release tab or button, one side at a time. Once the tab is released the visor will feel loose.
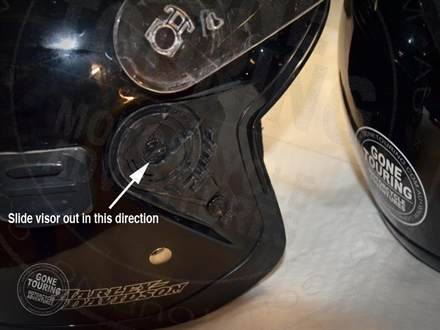
5. Slide the visor off by pushing it straight off the helmet.
6. Replace with the new visor by sliding it onto the helmet in the up or open position.
7. Push the visor into the release mechanism until you hear it click in securely, then lock the thumb tab or button.

How to change a motorcycle visor helmet

Related Links
What to pack for motor cycle touring
How to replace a Harley-Davidson key FOB battery
How to put a Harley-Davidson in Transport mode
Click Here for; Helmet Standards in Western Australia
Click Here for; Helmet Standards in Victoria
Click Here for; Helmet Standards in South Australia
Click Here for; Helmet Standards in Queensland
Click Here for; Helmet Standards in Tasmania
Click Here for; Helmet Standards in Northern Territory


